Using Eclipse for develop Android app mixed Java and C/C++ code

Eclipse is the "official" IDE proposed by Google for Android development. Usually Android app are written using Java code but for some specific task could be necessary to use native C/C++ code to interface with the Java side. Here a tutorial about how to configure Eclipse for a mixed Java and C/C++ code and how to develop it.
Please note, this tutorial will focus for developing under Windows. Basically 99% of the information will be the same for Linux and Mac too. In case of difference will put a short note.
Get the development tools
It' very probably you'll already have all the necessary tools but in case, at first, you need to get the Google Android SDK from here and NDK from here. The SDK package already have inside Eclipse with ADT plugin installed than no additional operations will be required. The only important note is to "install" these two packages in a path not containing spaces. For make and example install the packages in a path like "C:\Program Files\Android\" will cause some problem since there are a lot of command line tools that, in case of spaces, will "interpret" the space as params separator and return error. I suggest something like "C:\Android\" just for avoid problems. SDK contain basic Android tools and NDK contain the tools for allow communication between Java and C/C++ native code called JNI. Instructions about how to configure these tools can be found in the Google site itself.
Create Android app project
We are now ready to start. Eclipse main executable is in the path "SDK\eclipse". Start it and select new project through menu:
File => New => Project...
Then select Android application project and fill all the information required by the wizard. We'll name our example project as "AndroidTest".

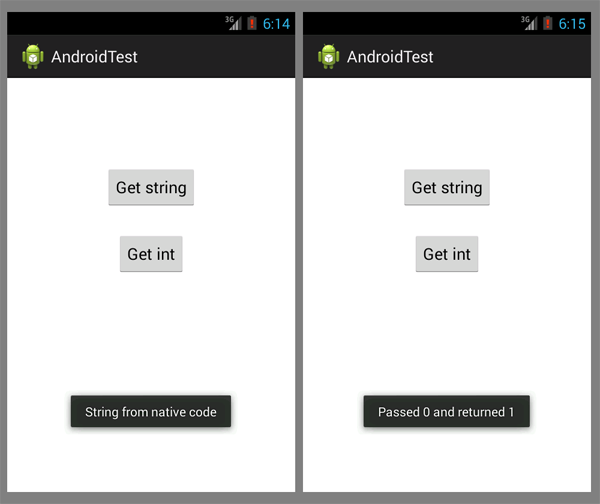
App interface will be very simple. Just two buttons making basic operations for demonstration.

Create java interface to native code
Now
the most interesting part. At first we need a java class to use as interface to native C/C++ functions to call. The syntax is very simple as you can see below:
public class NativeCodeInterface
{
  static
  {
    System.loadLibrary("NativeCode");
  }

  public native int get_int(int param);
  public native String get_string();
}
This is a standard java class with only two important points. The function loadLibrary, as the name suggest, will load our native code dynamics library (libNativeCode.so) at program startup. If the library will not be available the app will not start than keep in mind this "problem" in case you note this behaviour (check logcat debug). Available mean the library have to stay in the same folder of Android app or in some system path accessible by all apps. The second point to note is the keyword native used for define functions.
Get C/C++ functions format
Function to export from C/C++ side must have a specific format for allow java to invoke them. The rules of this format can be found in the documentation but, fortunately, we don't need to know it since the java provide a tool able to "convert" the java code to the corresponding C/C++ side. Open a command prompt and go to the project folder subdirectory path:
[My Eclispe workspace path]\AndroidTest\bin\classes
Here execute the following command:
javah -jni com.example.androidtest.NativeCodeInterface
Please note the "com.example.androidtest" is the name of our example app. In your case you'll have to type the name of your app package and the name of the class you chose as interface. If the command executed successfully you'll get a new file in the same current path called (following our name example):
com_example_androidtest_NativeCodeInterface.h
This is the C/C++ header file containing the format of the functions to export for allow java interfacing. The content will be similar to following:
/* DO NOT EDIT THIS FILE - it is machine generated */ #include<jni.h> /* Header for class com_example_androidtest_NativeCodeInterface */ #ifndef _Included_com_example_androidtest_NativeCodeInterface #define _Included_com_example_androidtest_NativeCodeInterface #ifdef __cplusplus extern "C" { #endif /* * Class: com_example_androidtest_NativeCodeInterface * Method: get_int * Signature: (I)I */ JNIEXPORT jint JNICALL Java_com_example_androidtest_NativeCodeInterface_get_1int (JNIEnv *, jobject, jint); /* * Class: com_example_androidtest_NativeCodeInterface * Method: get_string * Signature: ()Ljava/lang/String; */ JNIEXPORT jstring JNICALL Java_com_example_androidtest_NativeCodeInterface_get_1string (JNIEnv *, jobject); #ifdef __cplusplus } #endif #endif
As you can see here will have the same functions defined in the java class just created but in C/C++ format. You have to use these functions as they are without any changes since this is the only way for allow automatic "interface" between java and C/C++. For reach same result is there a more flexible way but also more complex since involve to know how C/C++ code have to be "configured" for allow java to call it. In this tutorial will use only this most easy way.
Add native C/C++ code
Here we'll add some native C/C++ file to be integrated into the whole app project. Before start just a short explanation. Java language used in Android app can communicate to native code using a mechanism called JNI. However with "native code" we mean a dynamics library written in C/C++ language and compiled using a toolchain (provided inside NDK). This dynamics library will export the functions with specific syntax just generated that allow to be called from Java side. Only dynamic libraries can be used, no static library and no standalone application. If you want to use functions exported by a precompiled static library you have to develop a dynamics library linked to the static library you need to use as "wrapper" between java and the functions you require. Another very important note to know is JNI is able to interface java with native code compiled in C format only. This mean if your code is C++ you need to create a wrapper code in C format to work with JNI and use this wrapper as interface to C++ code. In alternative you can use the extern "C" declaration before each C++ function you want to export to JNI. Now we have the functions prototype we
need to add the functions body. In your project folder create a new
folder called "jni" and move the header file just generated there. Once
done create inside the jni folder a new file called "NativeCode.c" with
the following content:
#include "com_example_androidtest_NativeCodeInterface.h"

JNIEXPORT jint JNICALL Java_com_example_androidtest_NativeCodeInterface_get_1int(JNIEnv *jenv, jobject jobj, jint param)
{
 return (param + 1);
}

JNIEXPORT jstring JNICALL Java_com_example_androidtest_NativeCodeInterface_get_1string(JNIEnv *jenv, jobject jobj)
{
 return (*jenv)->NewStringUTF(jenv, "String from native code");
}
The body is very simple. The first function return the same integer param passed from java side increased by 1. The second function return a string converted from C/C++ format to java format. The last step is to create an additional file (always inside the jni folder) called Android.mk with the following content:
LOCAL_PATH := $(call my-dir)

include $(CLEAR_VARS)

LOCAL_MODULE    := NativeCode
LOCAL_SRC_FILES := NativeCode.c

include $(BUILD_SHARED_LIBRARY)
This file is needed by the toolchain C/C++ compiler for know which file include in the compilation and the compilation result (shared library mean dynamics library). Once done all the work your Eclipse project folder should appear like the following:

Configure Eclipse for compilation
Now we have the native code ready but we need an additional step before. Currently we created an Android project. This mean Eclipse is configured for compile java code only and we need to "instruct" the IDE to compile native C/C++ code also. For reach such result we need the CDT (C/C++ Development Tools) component. Browse the Eclipse main menu and select this item:
Help => Install New Software...
In the "Install" window just showed, into the field "Work with" type the following URL:
http://download.eclipse.org/releases/galileo
Then press enter and wait for data load (please note, if your network have a proxy for Internet access follow this guide to configure Eclipse to go through a proxy). In case you have a different Eclipse version than Galileo you need to use the correct URL. Check Eclipse main site for additional info. In any case, once data load done, open the "Programming Languages" section and select the "Eclipse C/C++ development tools" item as below:

Then click "Next" and proceed with installation. In case your Eclipse will already have installed this component the wizard will advise you and no additional actions will be required. Now we have to convert our java project in a mixed java and C/C++ project. Select the following menu item in the Eclipse:
File => New => Other...
In the window showed open the C/C++ folder and select the "Convert to a C/C++ project" item as below (don't worry about the name, in this case "conversion" mean simply to add C/C++ management part):

Click Next and select the Android project name to convert ("AndroidTest" in our case). In the "Project Type" field select "Makefile project" and "-- Other Toolchain --".

Click Finish. Now Eclipse will ask you if you want to open this perspective now. Click to Yes for have both java and C/C++ compilation profile available.
Configure NDK
Next step is to configure Ecplise for invoke NDK compiler to use for C/C++ code. Into the Eclipse main window right click on the project name ("Project Explorer" subwindow) and in the popup menu select "Properties". Select "C/C++ Build" section. In the "Builder Settings" tab uncheck the "Use default build command" item and insert the full path of your NDK installation plus the name of the build script file "ndk-build.cmd" (in case of Linux and Mac system the name is only "ndk-build") as follow:

Then move to "Behaviour" tab, uncheck "Clean" field and clear all text from "Build" params field as below:

Click on the "Apply" button once done. Now is necessary to set the path where platform header files are located. In the same property window move to "C/C++ General" section and "Paths and Symbols" subsection. Here add the path where found header files to "GNU C" or "GNU C++" depends on your choice. In this example we'll use C files. The header file are inside the NDK installation folder. To be more precise the header files are under the "platform" subfolder but, as you can note, many different choices are available. Basically it depends by the Android target platform you selected for your project. In our example we use the API level 18 than the path to include will be
as in image below:
C:\Android\NDK\platforms\android-18\arch-arm\usr\include
as in image below:

Click to "Apply" and then "OK". This is the basic include, however if Eclipse report the error "Invalid arguments Candidates are:" for some common functions like memcpy, memset, strcpy and so on you have to insert an additional include path as follow:
Press the two button will show expected result. Hope this tutorial will help you.
C:\Android\NDK\toolchains\arm-linux-androideabi-4.8\prebuilt\windows\lib\gcc\arm-linux-androideabi\4.8\include
In case if development under Linux instead of windows subfolder we'll have linux-x86 as only difference.
Develop main activity code
Now the last step. We need to develop the java code into main activity for call our external native code functions. The body of activity should be like the following:
public class MainActivity extends Activity {

 NativeCodeInterface NativeCode = new NativeCodeInterface();

    @Override
    protected void onCreate(Bundle savedInstanceState) {
        super.onCreate(savedInstanceState);
        setContentView(R.layout.activity_main);

        Button GetStringBtn = (Button) findViewById(R.id.get_string);

        GetStringBtn.setOnClickListener(new OnClickListener()
        {
          public void onClick(View v)
          {
           String NativeCodeStr = NativeCode.get_string();
           Toast.makeText(getApplicationContext(), NativeCodeStr, Toast.LENGTH_LONG).show();
          }
        });

        Button GetIntBtn = (Button) findViewById(R.id.get_int);

        GetIntBtn.setOnClickListener(new OnClickListener()
        {
          public void onClick(View v)
          {
           int NativeCodeInt = NativeCode.get_int(0);
           Toast.makeText(getApplicationContext(), "Passed 0 and returned " + NativeCodeInt, Toast.LENGTH_LONG).show();
          }
        });
    }
}
As you can see java code call native functions and show result in a toast widget. The first get the string from native code and the second pass 0 as function param and get return of 1. The resource activity_main.xml file containing the app window used in this example is the following:
<RelativeLayout xmlns:android="http://schemas.android.com/apk/res/android"
    xmlns:tools="http://schemas.android.com/tools"
    android:layout_width="match_parent"
    android:layout_height="match_parent"
    android:paddingBottom="@dimen/activity_vertical_margin"
    android:paddingLeft="@dimen/activity_horizontal_margin"
    android:paddingRight="@dimen/activity_horizontal_margin"
    android:paddingTop="@dimen/activity_vertical_margin"
    tools:context=".MainActivity" >

    <Button
        android:id="@+id/get_string"
        android:layout_width="wrap_content"
        android:layout_height="wrap_content"
        android:layout_centerHorizontal="true"
        android:layout_marginTop="81dp"
        android:text="Get string" />

    <Button
        android:id="@+id/get_int"
        android:layout_width="wrap_content"
        android:layout_height="wrap_content"
        android:layout_below="@+id/get_string"
        android:layout_centerHorizontal="true"
        android:layout_marginTop="26dp"
        android:text="Get int" />

</RelativeLayout>
During compilation into Eclispe main window you should see (in "console" subwindow") something like this:
**** Build of configuration Default for project AndroidTest ****

C:\Android\NDK\ndk-build.cmd

"Compile thumb : NativeCode <= NativeCode.c
SharedLibrary  : libNativeCode.so
Install        : libNativeCode.so => libs/armeabi/libNativeCode.so

**** Build Finished ****
This will inform you about the compilation result of native code part. If no error occurred the generated libNativeCode.so (in our example) will be placed into project subfolder libs\armeabi. All the binary files present in this subfolder path will be automatically included inside the generated .apk file by Eclipse. This mean following this way you'll have the native code library already included in the package and placed in the same path of Android app. The result of all this work will be the following:
Press the two button will show expected result. Hope this tutorial will help you.


Comments
Post a Comment